

It’s always hard for me to switch gears after the Holidays. Just when I really start to get in the groove – they’re over. I hate taking down all of the festive decorations and packing them away. And, boxing up the tree ornaments is even worse. I hate doing that more than I hate ironing. But time marches on, and so must we all. So, I tuck away the memories of each Christmas past in wads of tissue paper, and reassure myself that in about 325 days, I get to do it all over again.
There were many things that I wanted to share with you these past few weeks, but I was too busy “living in the moment” and never quite found the time. Take this Red Velvet Snowflake Cake, for example. I served this lovely cake on Christmas Day and it was a showstopper. It took me more than two days to make, and I barely had time to slide it onto a pretty cake stand before my hungry Holiday revelers were chasing me around the dining room with forks in hand! I propped it on a coffee table in front of the Christmas tree to hurriedly snap a few pictures while Mr. SGCC ran interference for me. Honestly, this was probably the most beautiful cake I’ve ever made. I wish I’d been able to snag a few more glamour shots before it was reduced to crumbs.

I got the inspiration for this cake from the December issue of Southern Living magazine. There it was on the cover, in all its pristine glory - and I was instantly smitten. I knew then that I would have to recreate it for our Christmas celebration. The original was a white cake slathered in vanilla buttercream. The outside of the cake was garnished with a mass of “snowflakes” carved out of white fondant.
Of course, I couldn’t leave well enough alone. As gorgeous as that cake already was, I had to put my own spin on it. In honor of Christmas, I decided to make a moist and fluffy red velvet cake with cream cheese frosting. I knew that the deep, ruby-colored cake paired with pillowy, white clouds of cream cheese frosting would make a striking contrast when cut. And, did it ever!

The recipe for the red velvet cake also came from Southern Living. It actually makes a four layer cake, but I only wanted three. You could certainly make this cake using all four layers, and I’ve left the recipe as is for you to do that. I just wanted to avoid any chance of having “cake toppling” issues. I also knew that the snowflakes would add significant height to the cake, making it tricky to fit it in the fridge. Even with the three layers, the finished cake topped out at over eight inches tall. The batter for the fourth layer didn’t go to waste, though. It went into a small loaf pan to be enjoyed with a sparkling blush champagne as we opened our gifts on Christmas morning. A win/win situation for everyone!

If you want to make the fondant snowflakes like I did, you’ll have to do it at least a day in advance. They aren’t difficult, but they need to dry out for at least eighteen hours in order to be hard enough to stand on the cake without falling over.
I rolled out the fondant to a thickness of about 1/8-inch, and used different-sized snowflake cookie cutters to cut out the shapes. Then, I laid them flat on baking sheets until I was ready to use them.

After I assembled and frosted my cake, I placed the snowflakes all around the perimeter using small dabs of extra frosting as the “glue” to hold each in place.

Then, I placed more snowflakes of varying heights and sizes, standing straight up on the top of the cake.
After that, I chilled the decorated cake in the fridge for several hours to firm everything up.

Aaaah! A lovely cake fit for a snow queen! My guests were very impressed with my efforts. And, I was so proud!

I really had a blast putting this snowflake cake together! In fact, I’m thinking of using the same technique to make cakes for other occasions. What about pink fondant hearts for Valentine’s Day? Or, brightly colored eggs for Easter? Fondant flags for the Fourth of July, anyone? Oooh! My head is spinning! I think I need some more cake… ![]()
Red Velvet Snowflake Cake
adapted from Southern Living, here and here
Ingredients
-
3/4 cup butter, softened
-
2 cups sugar
-
3 large eggs
-
3 tablespoons red liquid food coloring
-
1 tablespoon vanilla extract
-
2 3/4 cups all-purpose flour
-
1/2 cup unsweetened cocoa
-
1 tablespoon baking powder
-
3/4 teaspoon baking soda
-
1/4 teaspoon salt
-
1 1/2 cups buttermilk
-
Cream Cheese Frosting (recipe follows)
-
Fondant Snowflakes (recipe follows)
Directions
-
Preheat oven to 350°. Lightly butter and flour 4 8-inch round cake pans. Set aside.
-
Beat butter at medium speed with a heavy-duty electric stand mixer until light and fluffy, about 2 -3 minutes. Gradually add sugar, beating until well blended. Add eggs, 1 at a time, beating after each addition. Add food coloring and vanilla, and mix well.
-
Whisk together flour and next 4 ingredients in a separate bowl. Add flour mixture to butter mixture alternately with buttermilk, beginning and ending with flour mixture. Beat at low speed until just blended after each addition. Spoon 1/3 of batter into each prepared cake pan and smooth the tops.
-
Bake all pans at the same time, with 2 pans on top rack and 2 pans on bottom rack for 10 minutes. Rotate pans, and bake another 10 to 12 minutes or until a cake tester inserted in centers comes out clean. Cool cakes in pans on wire cooling racks for 10 minutes. Remove cake layers from pans to wire racks, and cool completely.
-
To frost cake, spread about 1 cup Cream Cheese Frosting between cake layers. Frost top and sides with remaining frosting. Decorate top and sides with Fondant Snowflakes.
Cream Cheese Frosting
Ingredients
-
2 8-ounce bricks cream cheese, softened
-
4 ounces (1 stick) unsalted butter, softened
-
2 teaspoons vanilla
-
6-8 cups powdered sugar
Directions
Beat cream cheese until light and fluffy. Add butter and beat until completely homogenized. Mix in Vanilla. Add sugar 2 cups at a time and beat until frosting reaches the desired consistency. If it seems too soft, pop it in the fridge for about 20 minutes to firm up.
Fondant Snowflakes
White rolled fondant
Snowflake cookie cutters
Remove fondant from packaging and knead on a clean, dry surface until soft and pliable. If the fondant sticks, sprinkle a little powdered sugar on your hands. Roll out fondant to about 1/8-inch thickness. Using cookie cutters, cut out snowflake shapes and set on a cookie sheet lined with wax paper. Leave in a cool, dry place for at least 18 hours to harden.

Filed Under: Cakes and Cupcakes, Holiday Dishes, Holidays, Recipes
 TWD: Swedish Visiting Cake
 TWD: Tiramisu Cake
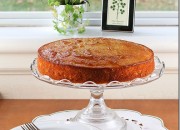 TWD: French Yogurt Cake and an Irish Blessing


On January 03, 2013 at 1:06pm, Carol said...
Very pretty!
On January 03, 2013 at 1:15pm, Rosa said...
Beautiful and ever so tempting.
Best wishes for 2013!
Cheers,
Rosa
On January 03, 2013 at 2:36pm, Vicki Bensinger said...
Your cake is beautiful and I love the snowflakes on it. Fun and festive cake and I know it tastes great! Thanks for sharing this idea and recipe.
On January 03, 2013 at 3:01pm, Rachel (S[d]OC) said...
That is gorgeous. I’m glad you had your chance to take photos before it was eaten, but how could anyone resist? Cakes are for eating after all.
On January 03, 2013 at 4:48pm, Lauren said...
A really really stunning cake, I especially like the snowflakes and agree, cut-out hearts would look great for Valentine’s Day in a similar way. Thanks for sharing.
On January 03, 2013 at 6:31pm, marcellina said...
What an amazing cake! I’m sure your guests were racing each other for a piece! Mmmmmm!
On January 03, 2013 at 8:30pm, Foodiewife said...
What disappoints me, most, about blogging in winter is the loss of natural light. So challenging! Still, this one is a show stopper. Buttermilk is one of my favorite ingredients in a cake. It turns out so moist! I’ve never worked with fondant. Ever. I need to add that to my bucket list. Beautiful cake. Yes, hearts for Valentine’s Day would be beautiful.
On January 03, 2013 at 9:52pm, Jayne said...
This is so so beautiful! I know I can never have the patience to decorate a cake like that. I’m very intrigued about the cake recipe, though. The crumbs look so moist and tender.
On January 03, 2013 at 10:07pm, Dorothy @ Crazy for Crust said...
This is stunning! I love those snowflakes.
On January 04, 2013 at 12:44pm, vanillasugarblog said...
that recipe from southern living actually has been rated the best for getting it as close as one can be to a real authentic southern red velvet.
and yes, it is gorgeous!